

You bring the pistol up, catch the front sight in the notch, hold your breath - and still can't tell whether you're looking at the right thing. Dry fire at home makes that doubt loud: a target on the wall, click after click, and no real answer to "am I aiming correctly or not". Let's take aiming apart piece by piece: sight alignment, front sight focus, the mistakes that push bullets off target - and how to build the whole skill at home, no range and no ammo.
What is aiming made of: sight alignment and sight picture?
Sight alignment lives entirely between your eye and the pistol. The target plays no part in it: there is your pupil, the rear sight and the front sight, and your job is to put them on one line.
The sight picture appears when that line lands on a target: aligned sights plus the exact spot you want the bullet to hit.
The order matters. Until alignment is automatic, playing with the sight picture is premature: a tilted front sight cancels out any beautiful hold on the target. That's why this guide is built bottom-up - from sight geometry to work on the target.
How do you line up the front and rear sights?
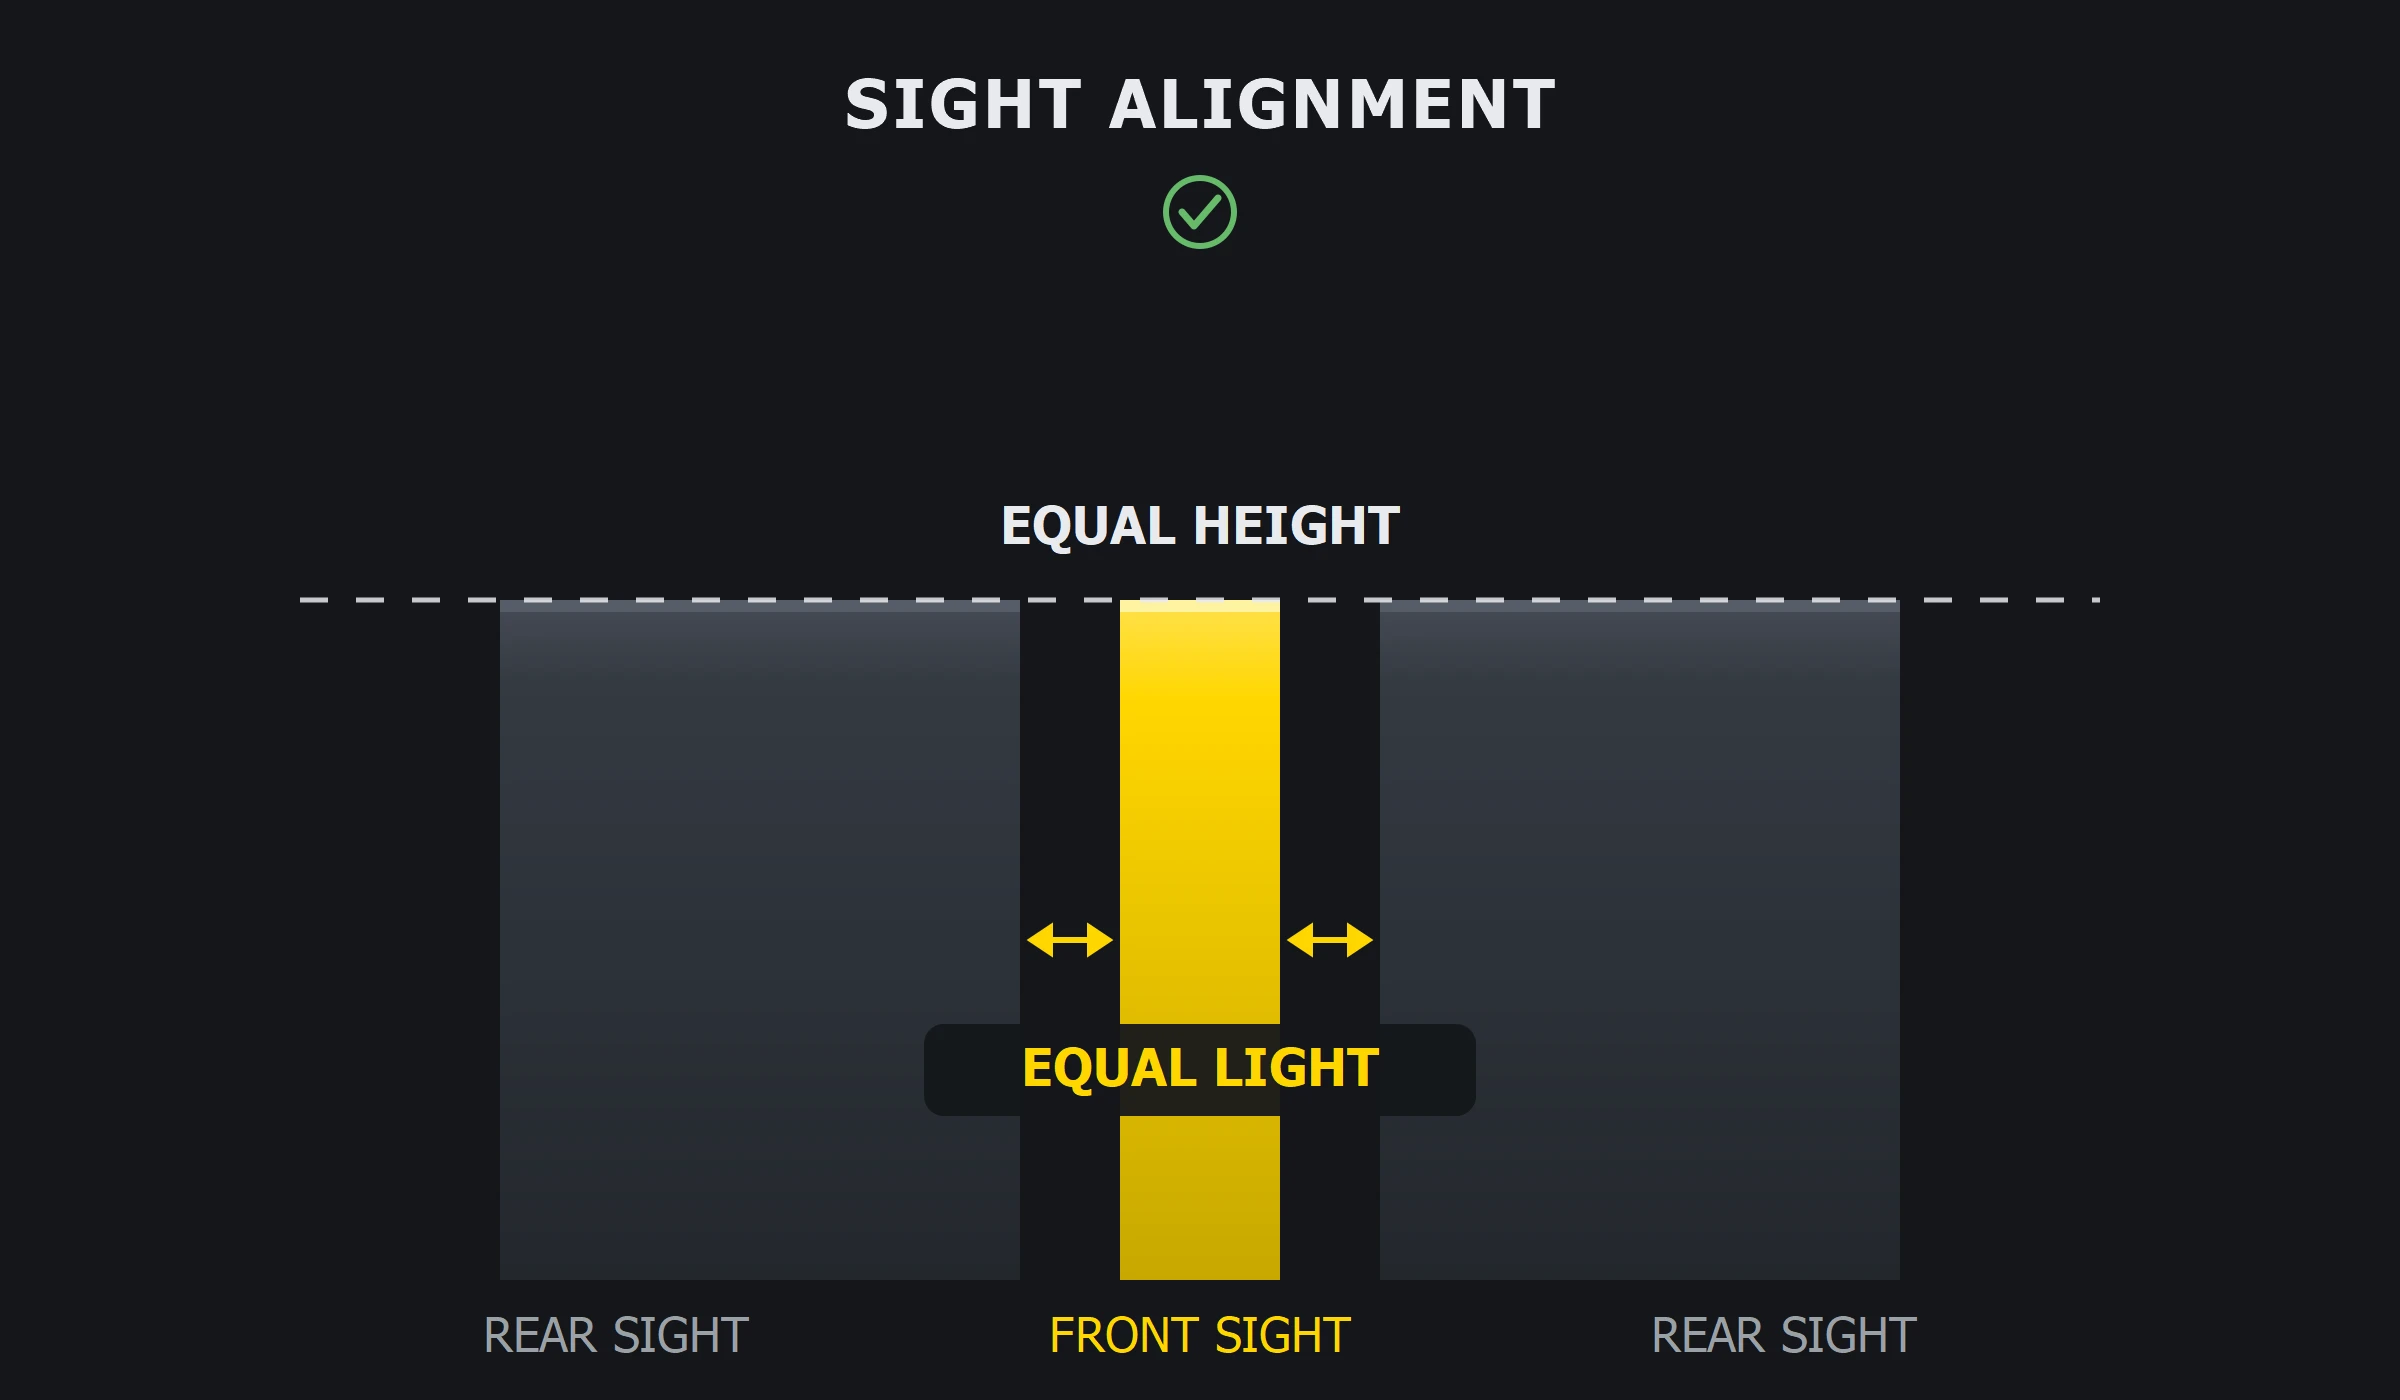
You look through the rear notch and set the front sight on two axes at once. Vertically: its top edge comes level with the top of the rear sight - the post neither sticks up nor sinks. Horizontally: the strips of light between the post and the notch walls are the same width on the left and on the right.
Sounds simple, and that simplicity is the trap. A pistol's sight radius is short - under eight inches on most models - so a tilt your eye barely registers turns into a real shift downrange: a millimeter at the sights is centimeters on the target. The farther the target, the more that same millimeter costs.
That sets the training goal: sight alignment has to assemble fast and identically, click after click. No "a bit like this today, a bit different tomorrow" - the geometry is the same every single time.
Where do your eyes go - the front sight or the target?
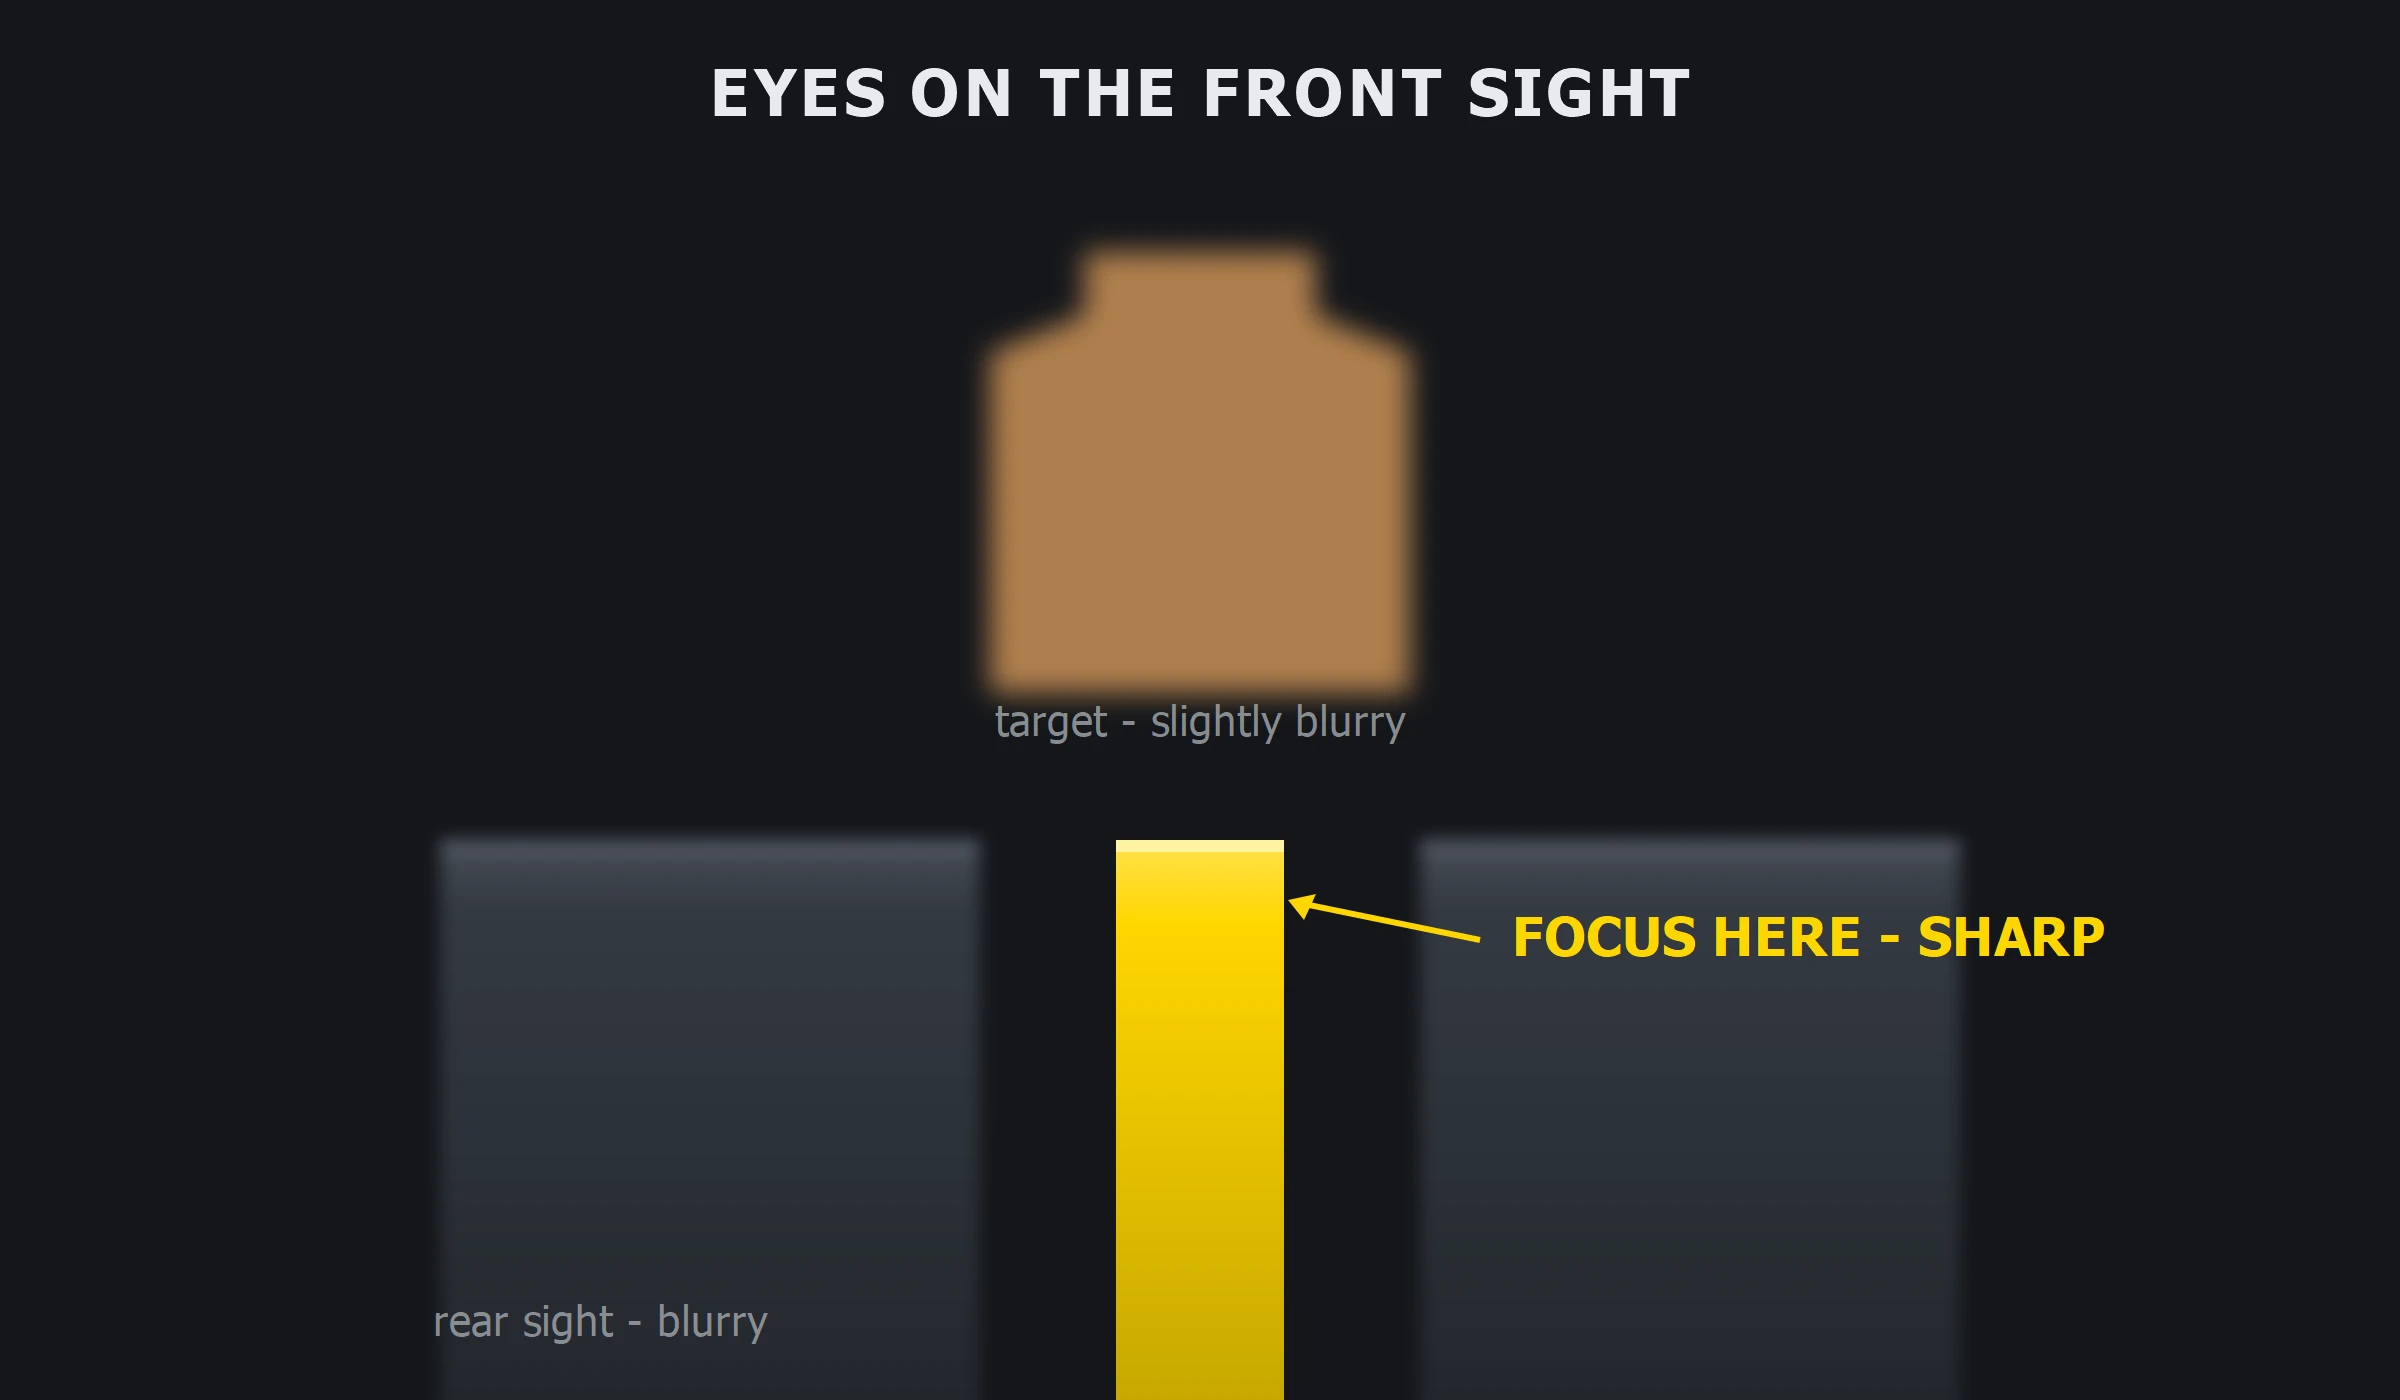
There are three planes in front of you at different distances: the rear sight close to your eye, the front sight at the muzzle, and the target meters away. The lens of your eye focuses at one distance at a time, and with iron sights the shooter's choice is always the same - the front sight. A sharp front post against a slightly blurred rear sight and a blurred target is what a correct shot looks like from behind the gun.
Beginners usually do the opposite: they look at the target, because that's where they want to hit. The front sight blurs, the tilt stops being visible, and sight alignment drifts without the eye noticing. The other common pattern is bouncing focus back and forth - target, front sight, target again. By the time the shot breaks, the eye is tired and the picture never got assembled.
Dry fire at home is the perfect place to install the "eyes on the front sight" habit: you click and watch exactly one thing - did the front sight stay sharp and level at the moment of the click.
This control is why I built IPSC Tracker - an Android app for dry fire at home. It catches every dry-fire click through the microphone and records the run on video: the footage shows what your eye misses in the moment - whether the front sight dipped at the click or stayed put.

Why do shots land where you didn't aim?
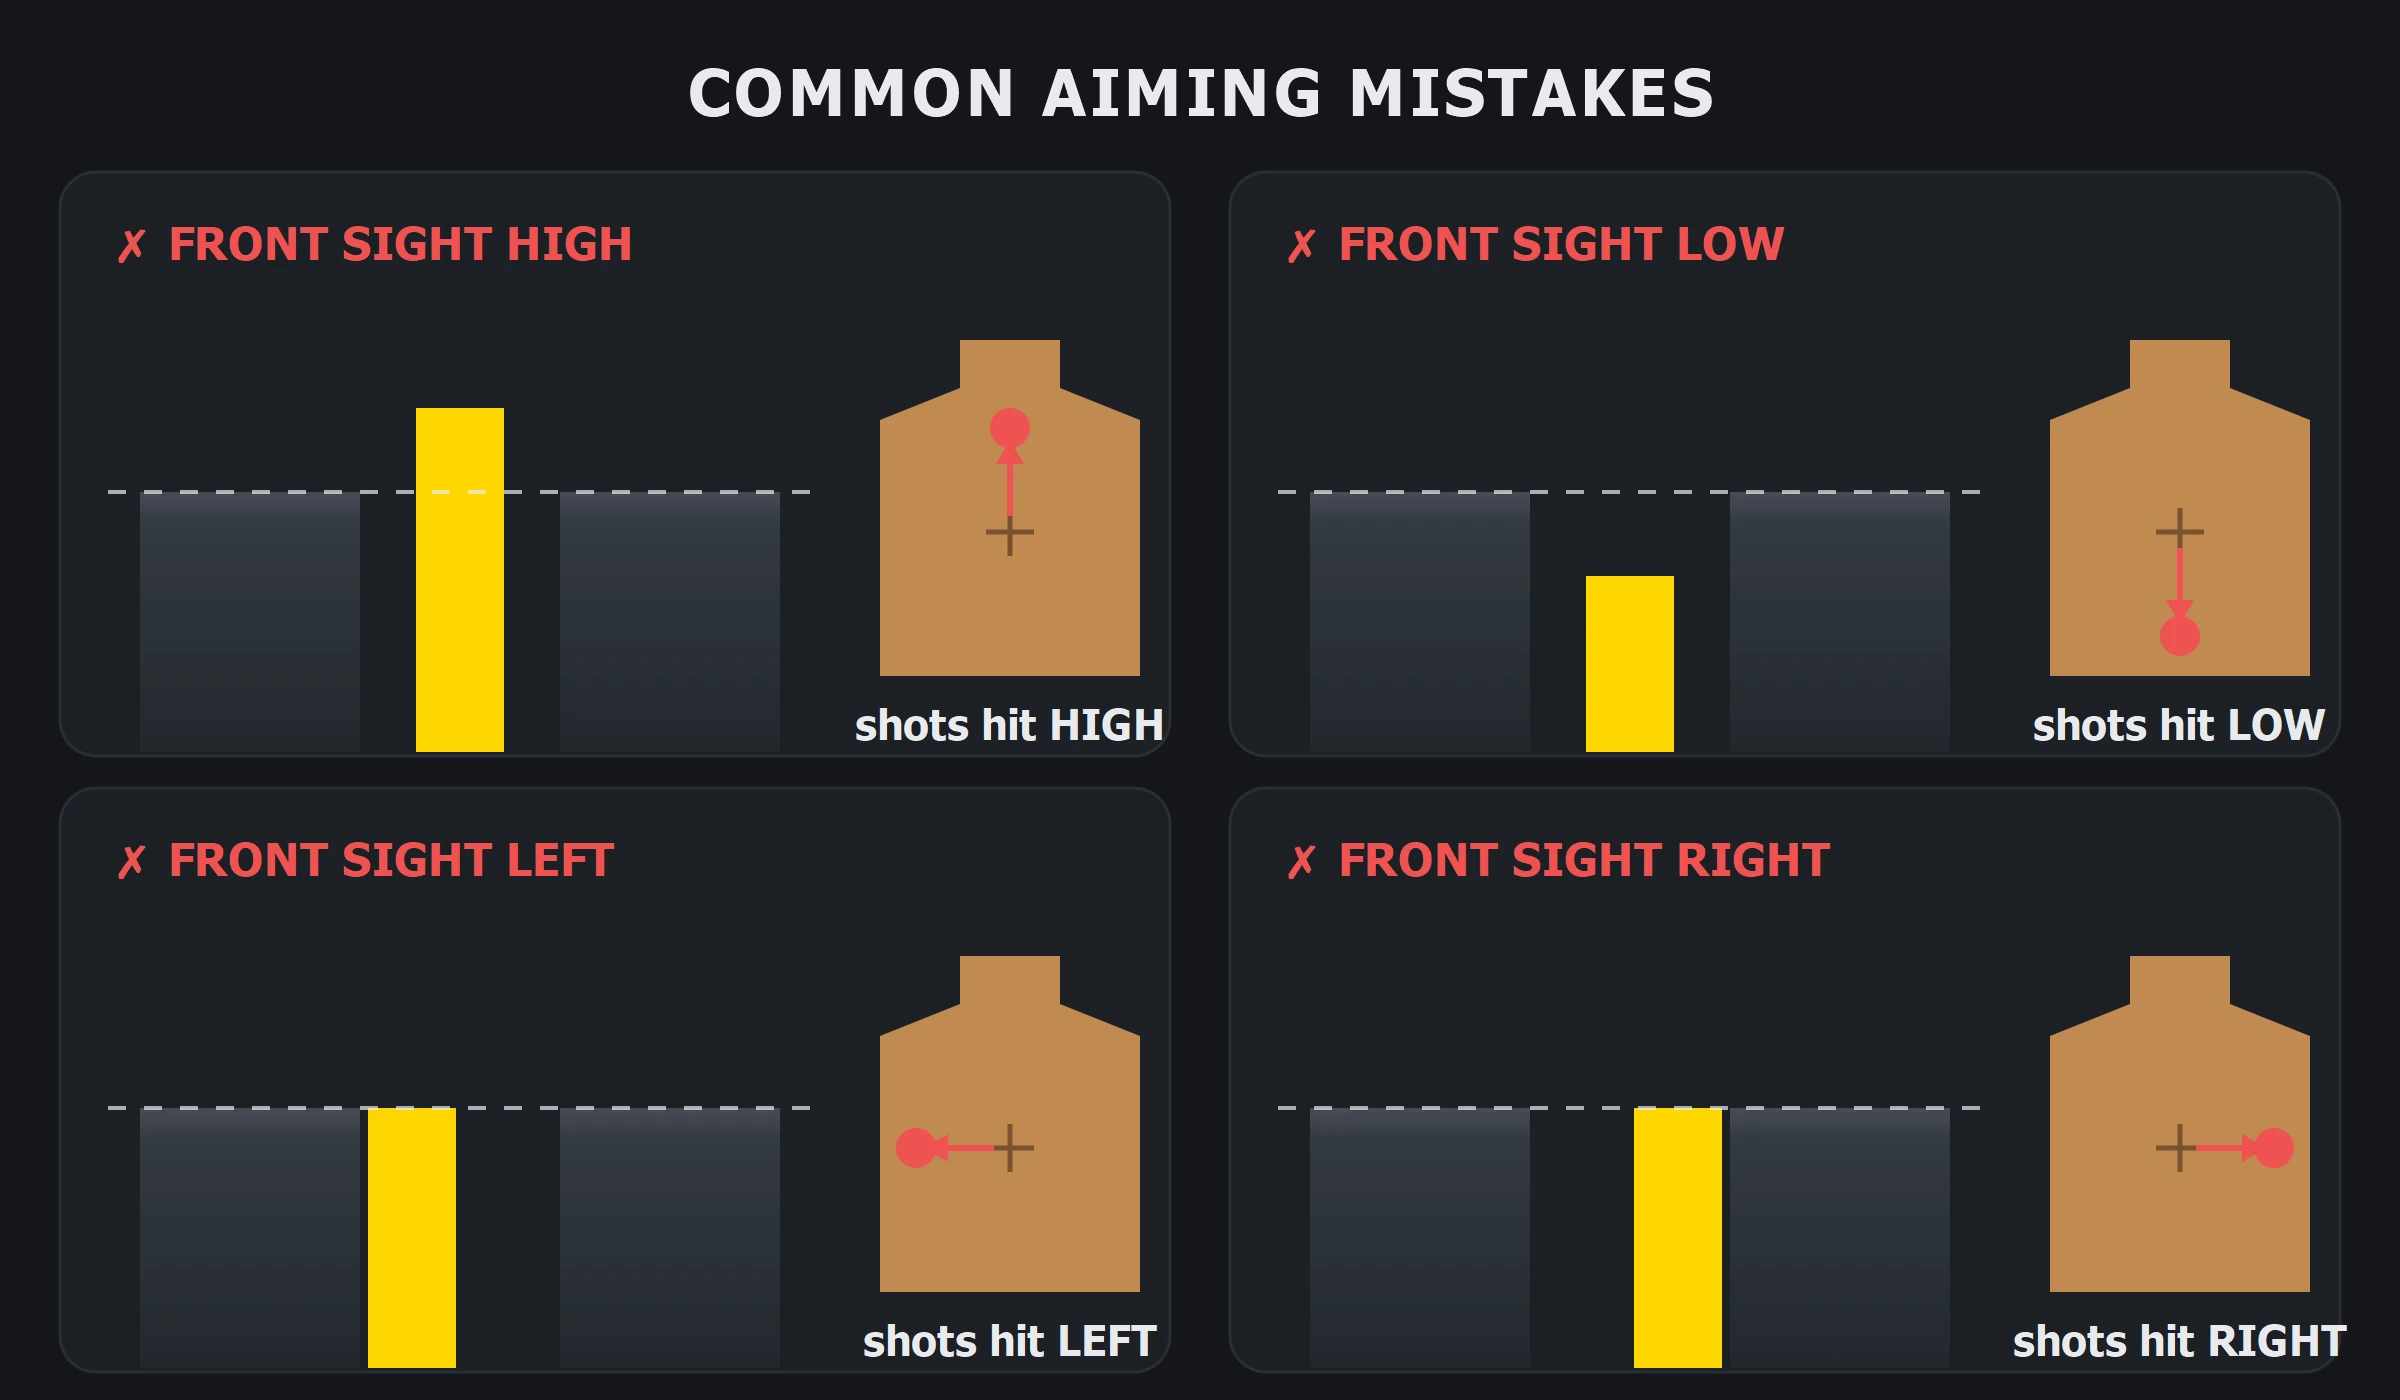
The four classic errors read straight off the target:
- Front sight above the rear sight - the group lands high.
- Front sight sunk below - hits drop low.
- Front sight pressed to the left wall of the notch - bullets go left.
- Front sight pressed to the right wall - they go right.
The key word is "steady". If ten hits sit in a tight group above center, you're looking at a systematic sight alignment error, and it's a quick fix: show your eyes the correct reference once and lock it in with repetitions.
Chaotic spray in all directions is a different story. That one usually comes from jerking the trigger or strangling the grip, and it's trained out with different drills. Keep the two problems separate: systematic drift is a question for your eyes, scatter is a question for your hands. Fix the wrong one and you lose a month.
Which sight picture is right: center, 6 o'clock or combat hold?
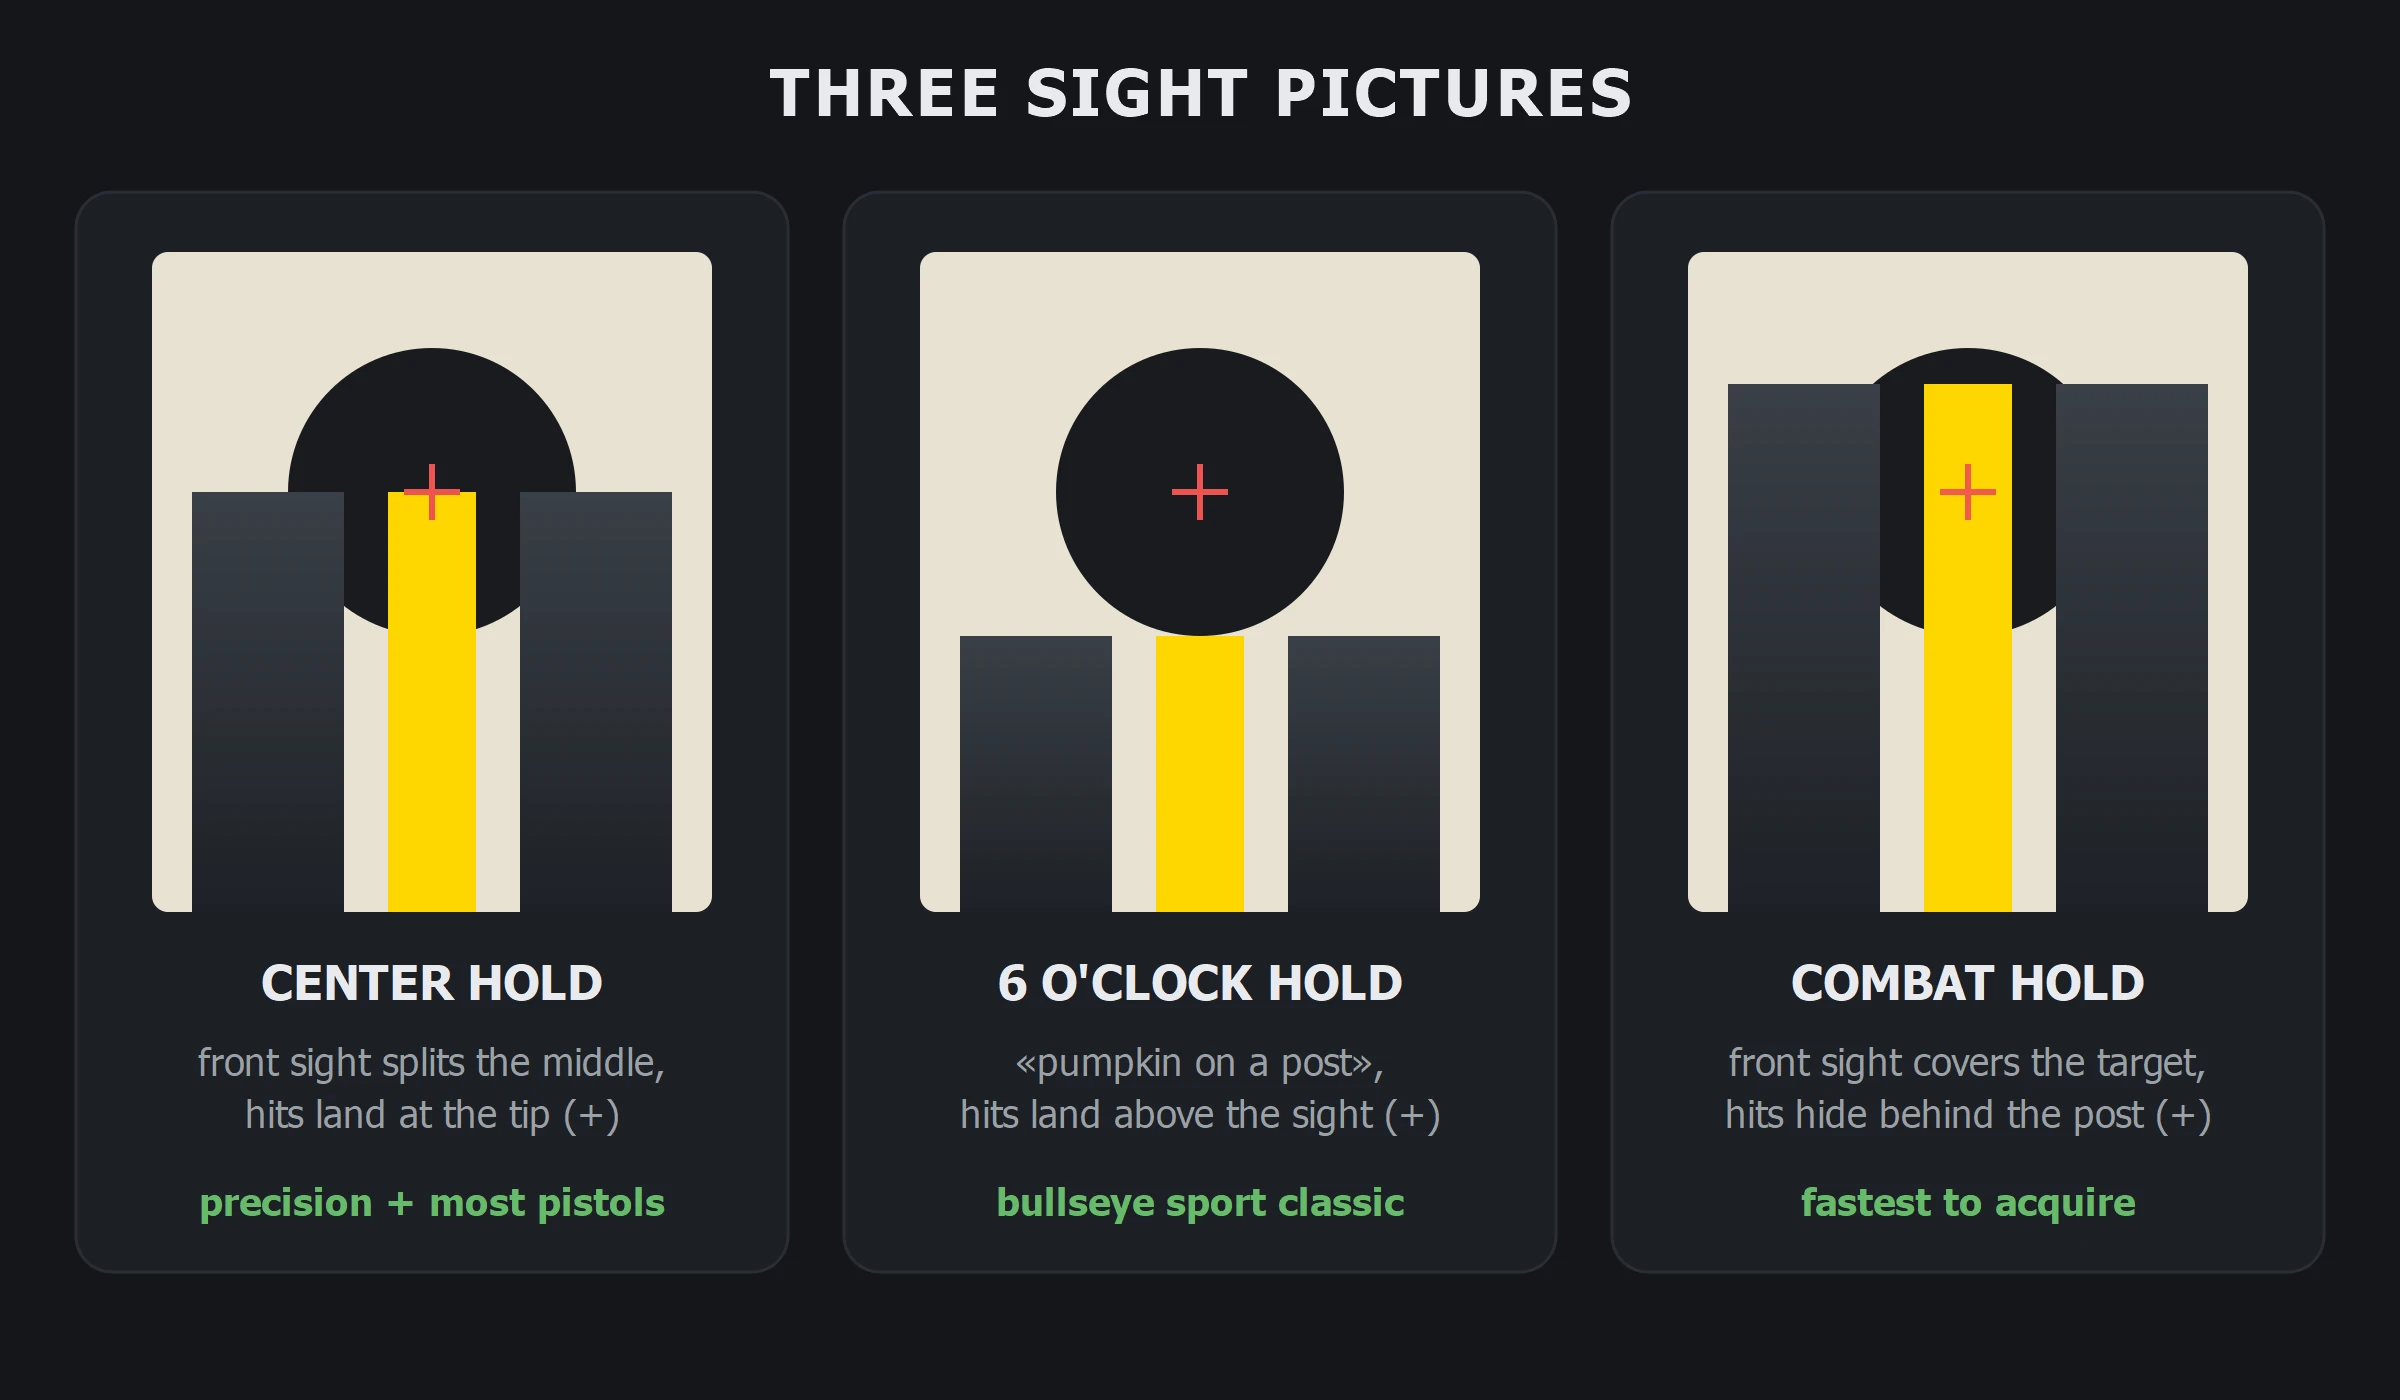
The sight picture answers one question: where do the aligned sights sit relative to the target. History settled on three answers.
Center hold. The top of the front sight cuts the center of the target, and the bullet arrives right at that top edge. The most visual method and the practical shooting standard: most modern factory pistols are zeroed for it.
6 o'clock hold. The front sight tucks under the target and touches it from below - shooters call this picture "a pumpkin on a post". The bullet arrives above the sight, in the center of the circle. A bullseye sport classic: the whole target stays visible, nothing covers it.
Combat hold. The front sight covers the target with itself, and the hit hides behind the post. It wins on speed at short distance and loses on precision: at the moment of the shot your eye can't see exactly where the bullet went.
Which of the three is yours is decided by your pistol's zero. You check it at the range, from a rest, with a slow group at a dot: where the group lands relative to the aiming point is how your gun is zeroed. At home, for dry fire, take the center hold as your base - it's the clearest one for controlling sight alignment, and it's what most modern factory pistols are zeroed for.
One eye or both?
First find your dominant eye. Stretch out an arm, make a ring with your fingers, catch any object across the room inside the ring, then close one eye at a time. The eye that keeps the object inside the ring is your dominant one.
Usually the dominant eye matches the strong hand, but cross-dominance happens: a right-handed shooter with a dominant left eye. A slight turn of the head fixes it, putting the dominant eye behind the sight line while the sights stay where they were.
Both eyes open is the goal worth reaching in practical shooting: wider field of view, faster transitions between targets, less strain. But if the picture doubles for now - squint the weak eye without guilt. The skill of muting the second image is built by the same dry-fire clicks at home, no special talent required.
How do you train aiming at home, with no range and no ammo?
Safety first, no compromises: the gun is unloaded, the magazine is out, there is no live ammunition in the room at all, and the muzzle points at a solid wall. The full safety checklist for home training is in the guide to starting dry fire at home.
The Wall Drill itself:
- Stand about a meter from a blank, light-colored wall. No target - that's the whole point.
- Bring the pistol up and assemble the sight alignment: equal height, equal light, focus on the front sight.
- Press the trigger smoothly while holding the picture.
- At the click, answer one question: did the front sight stay level or did it twitch?
- Do 10-15 reps, rest your eyes, then run another set.
The blank wall removes the beginner's main temptation - looking at the target. What's left is the sights and your eye, which is exactly the skill we're building. The Wall Drill doubles as a diagnostic: the front sight dips at the click - you're slapping the trigger; it swings sideways - you're squeezing the grip too hard.
Once sight alignment holds set after set, bring the target back - our printable targets will do, and the IPSC zone breakdown shows what to aim at on them. From there you move from bare alignment to the full sight picture, in the same smooth cycle.
How do you see progress in numbers?
Aiming is a cumulative skill: the eye assembles the picture faster with every hundred reps, but from the inside that growth is almost invisible. To make it visible, training needs a score: how many clicks went clean into Alpha - the top scoring zone - and how much time the shot takes to assemble.
The drills in IPSC Tracker are built exactly around that: every scored drill demands "Alpha only". First Shot DA teaches you to hold sight alignment through a long first trigger press, Bill Drill Cond 3 - to assemble the picture six times in a row, and 2-Reload-2 folds points and seconds into one number - the hit factor. The app catches every dry-fire click with the microphone and records the run on video, so the front sight dip you missed in the moment stays on the footage.
Beginner questions that come up first
The front sight keeps floating a little. Can that be cured? Completely - no, and you don't need to chase perfect stillness: micro-movement exists for every shooter. The working approach is different: accept a small wobble zone as normal and press the trigger smoothly inside it instead of hunting for the perfect moment.
Should I wait for a perfect picture before every shot? For a slow precision shot - you can. In practical shooting an "acceptable" picture does the job: the closer and bigger the target, the rougher the alignment tolerance. Your own tolerance comes out of hit statistics - the numbers from the section above.
I run a red dot. Do I need any of this? There's nothing to align: the dot already sits on the target, and that's the red dot's main gift. But the focus discipline and the "did it twitch" control at the click stay - and so does scoring Alpha and time.
I wear glasses. Will aiming work? Yes. Front sight focus works the same in glasses - just make sure the frame doesn't cut the sight line, and train in the same glasses you'll shoot in.
Aiming builds faster than any other shooting skill, because it needs no range, no ammo, not even a target: a wall, an unloaded pistol, ten minutes a day and an honest score.