

You bring the pistol up, and it feels fine - right up until the shot lands somewhere you didn't intend. The instinct is to blame the trigger or the sights. But the shot was decided earlier: in how you stood, how your hands closed on the grip, how the pistol came out of the holster. These are the dry fire fundamentals - stance, grip and draw - and not one of them needs a single live round. They're pure motor skill, and motor skill is built at home, dry, through honest repetition. The range is for something else. The foundation the whole of your shooting stands on gets assembled in your own room, with an unloaded gun and not one shot fired.
What are the fundamentals you build at home?
Shooting looks like it lives at the muzzle end - the sights, the trigger, the bang. In reality most of it is body mechanics that happen before the sights ever matter. Three of them form the base: the stance you shoot from, the grip that holds the pistol on line, and the draw that gets it there. Get these wrong and no amount of aiming saves the shot.
The good news is that all three are dry fire work. They cost nothing to drill - no range fees, no ammo, no travel - because they're about how your body moves, not where the bullet goes. We'll take them in the order they actually happen: stance first, then grip, then the draw that ties them together.
How should you stand? The athletic stance
The stance most shooters use today is called the isosceles - named for the even triangle your extended arms make. The logic behind it is simple. The pistol jumps under recoil, and that jump has to be soaked up by your whole frame, not by your wrists. So you stand the way you'd stand to take a shove from the front.
Feet about shoulder-width apart. Weight on the balls of your feet, not the heels. Knees soft, slightly bent, never locked. Chest and shoulders carried forward, so you're leaning slightly over the gun rather than away from it. Both arms push out evenly and form that triangle.
Check yourself the other way around. A beginner tends to stand upright and lean back, because that feels like the easy way to hold the pistol's weight up. But that relaxed posture takes the recoil into the whole skeleton, the gun wanders after each shot, and the second shot has to be rebuilt from scratch. Lean forward, and the muzzle drops back onto the target on its own.
This is where the mirror earns its place. Stand in front of one, build the stance, press the pistol out - and you see yourself from the outside: are you square, are your arms going out evenly. A mirror doesn't flatter. No shooting, no target - just the body, learning the right position under its own watch.

How do you grip the pistol correctly?
The grip is the most underrated thing a beginner does and the one that matters most. It's what keeps the pistol on line and stops the muzzle from wandering.
Start with the central paradox. It feels like the harder you squeeze the shooting hand, the more accurate you'll be. The opposite is true. If a right-handed shooter clamps down with the right, working hand, the trigger finger loses its feel, the press turns into a jerk, and the muzzle is dragged off line before the shot even breaks.
So the effort is split between the hands. For a right-hander: the right, shooting hand takes roughly 30-40% of the grip, and the left, support hand takes 60-70%. The left hand holds. The right hand works the trigger, and it has to stay loose enough that the finger presses smoothly without towing the whole muzzle with it. The short version: the left hand holds, the right hand shoots. For a left-hander it all mirrors - the right holds, the left shoots.
Now how the hands actually sit. The shooting hand rides as high on the grip as it can, right up under the tang: the higher it sits, the shorter the lever and the less the muzzle flips. The palm wraps the grip tight, no gaps. The support hand fills the empty space on the other side, its fingers under the trigger guard. Both thumbs point forward, along the frame, toward the target. The shooting-hand trigger finger stays off the trigger, laid along the frame, until the shot.
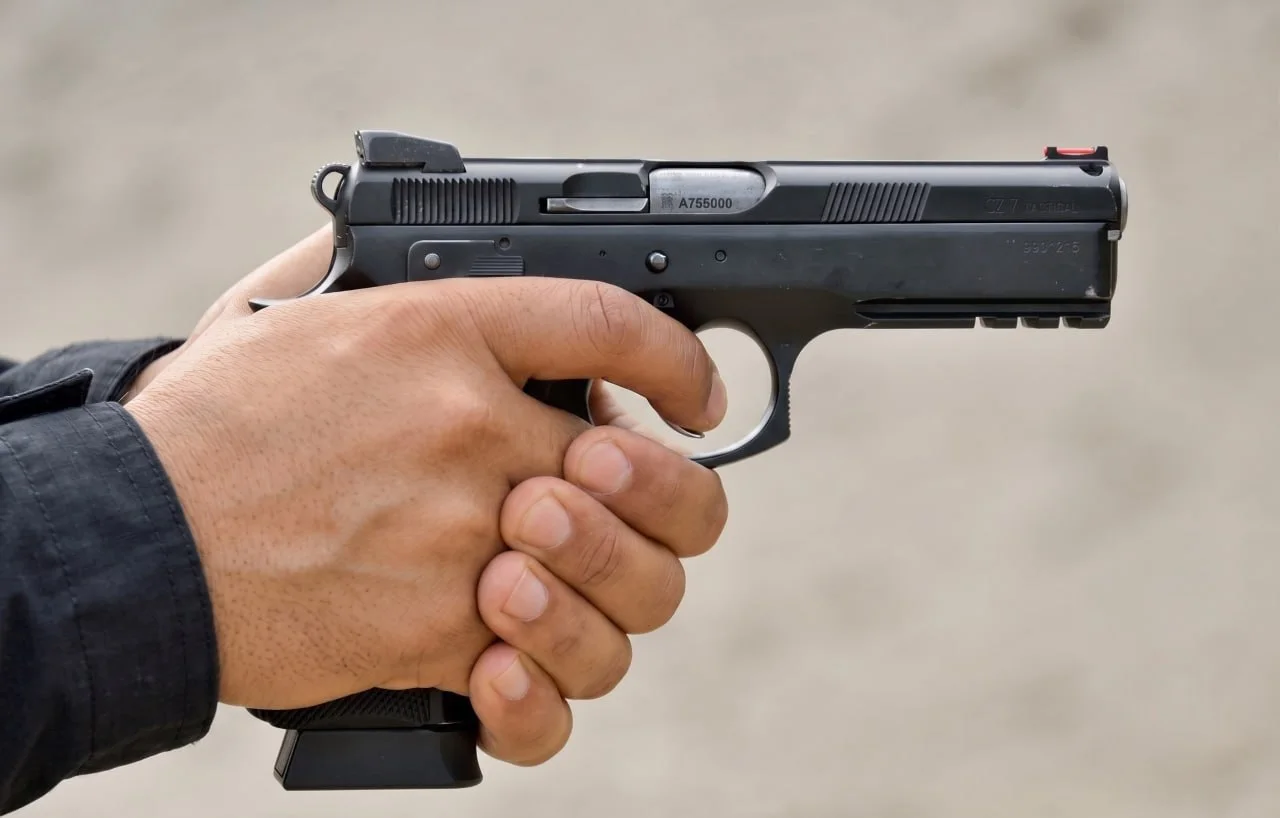
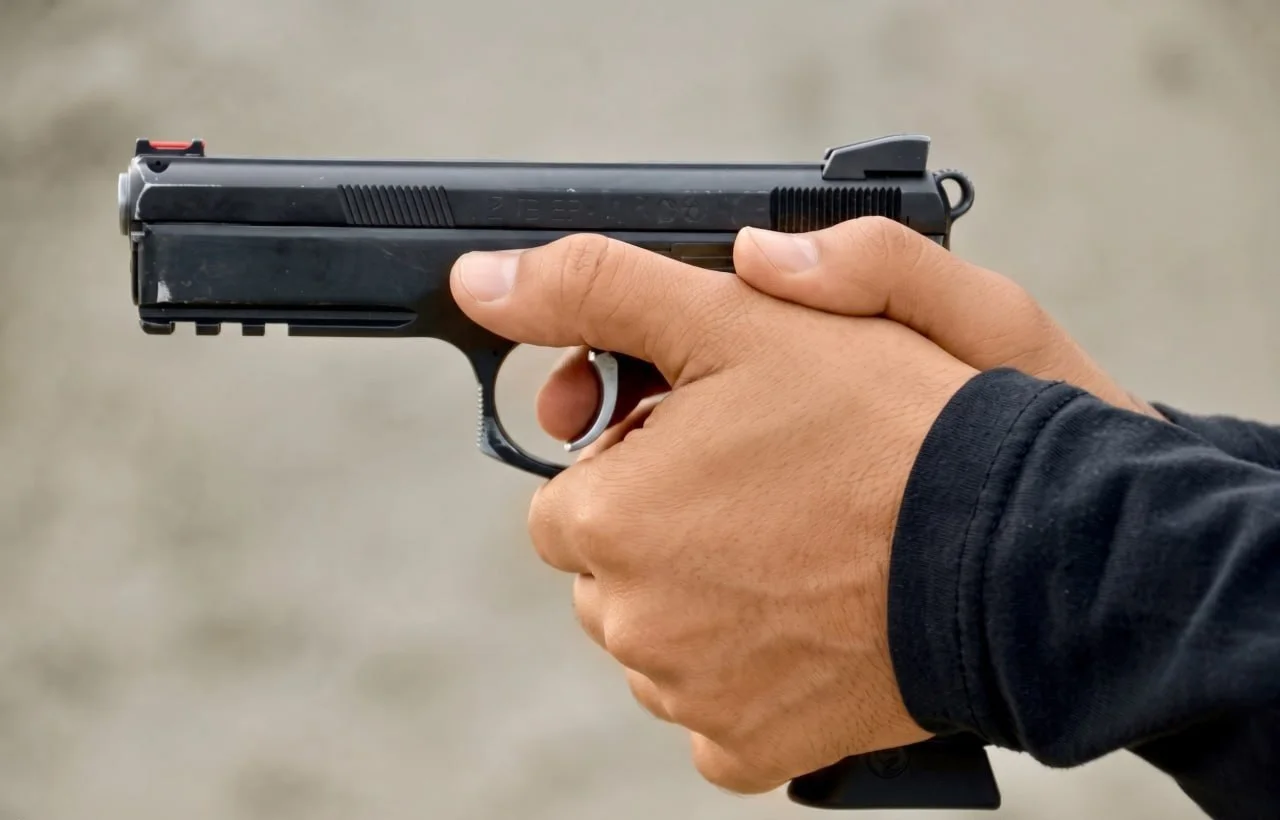
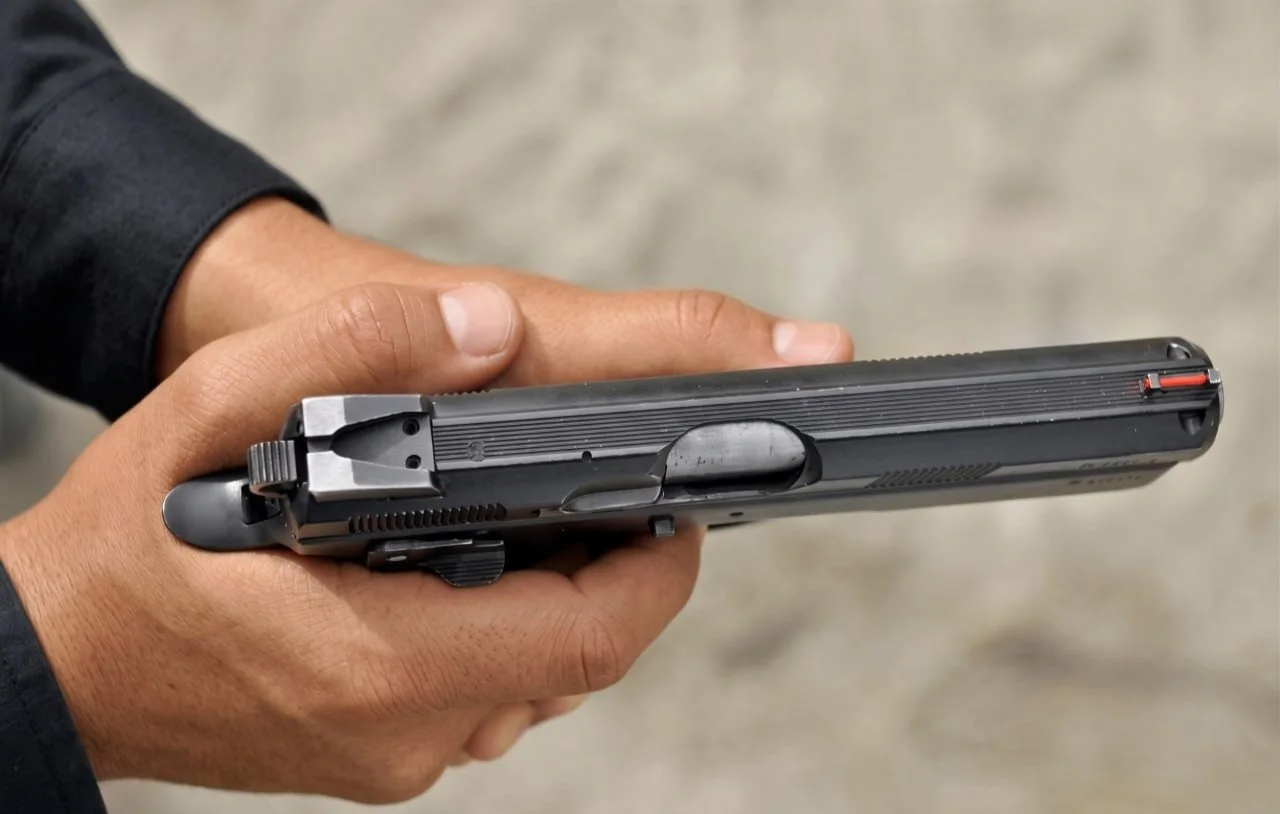
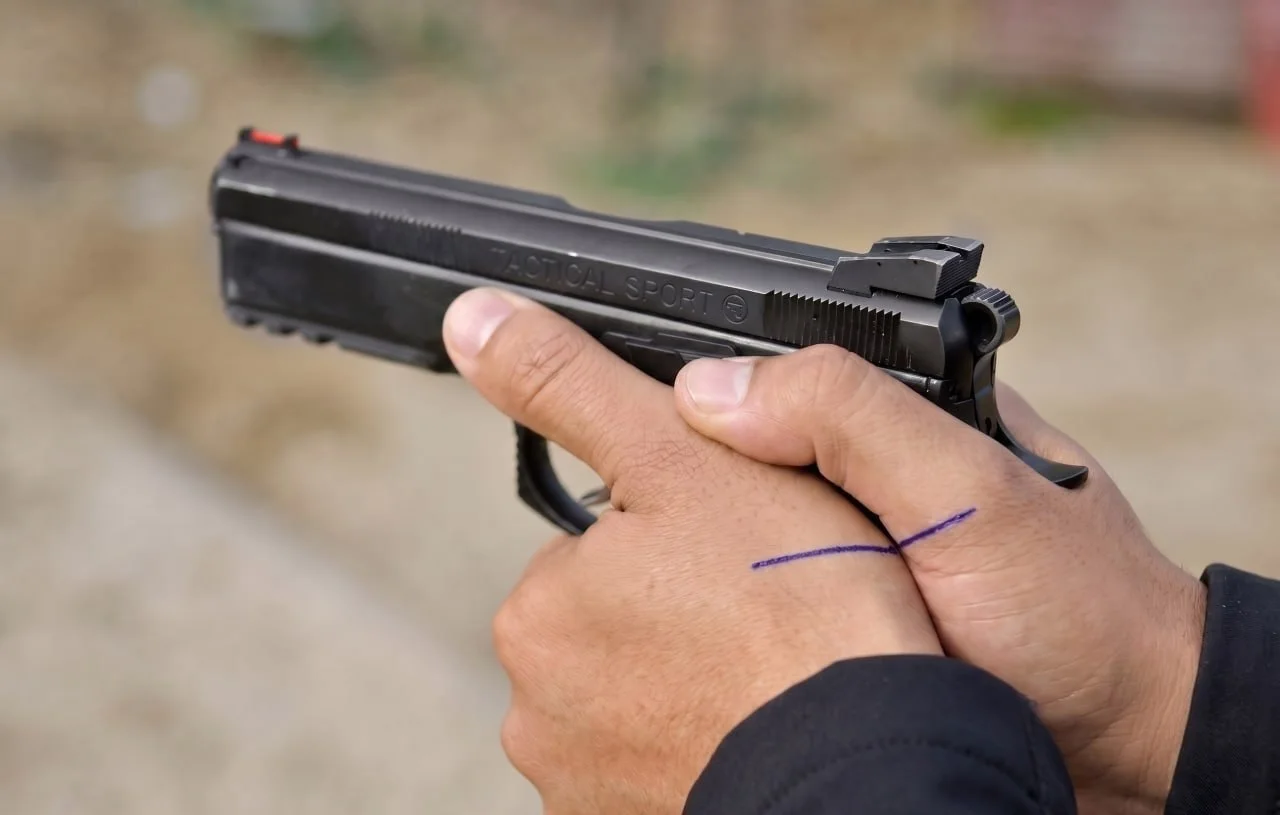
Once you've built this grip, it shouldn't change from shot to shot. That's why it matters to take it correctly the first time - and, as we're about to see, to take it while the pistol is still in the holster.
How do you draw from the holster in three counts?
The draw is how the pistol gets from the holster into the grip and stance you just built. Break it into three counts and drill it slowly - at home you'll be repeating exactly this breakdown.
Count one. The shooting hand goes onto the grip - high, right under the tang, in the same grip you won't be re-adjusting later. At the same moment the support hand moves to the center of the chest and waits there, wrist turned, thumb pointing straight at the target, ready to take the gun and settle into the grip.
Count two. The pistol comes out and moves to the chest, where the second hand meets it. Here, at the chest, the two-handed grip locks in completely - both hands together, everything as described above. The muzzle is already turned toward the target.
Count three. The hands press out from the chest toward the target. The pistol travels in a straight line to the target, and at the end of that press you're ready to work the trigger. Pressed out - and the shot.
Three counts isn't a ritual for its own sake. It's a breakdown that lets you learn a complex motion slowly and correctly, then fuse it into one smooth, fast movement. First you honestly run one-two-three with pauses. Then the pauses collapse, and the draw becomes a single motion. If your holster and belt aren't sorted yet, the belt setup guide covers where everything sits.
How do you turn this into a skill at home?
First and non-negotiable: safety. The gun is unloaded. Ammunition is in another room, not the one you train in. The trigger finger stays off the trigger until you're deliberately working it, and you always control where the muzzle points. Dry fire is exactly as safe as you are disciplined about these small things - the full checklist is in the guide to starting dry fire at home.
What to train with. If the law where you live allows it - an unloaded live pistol. If not, and this is an honest, working option for home, an air pistol or an airsoft replica. One thing matters here: the tool has to match the real gun in weight, size and grip, so the motor skill transfers one to one. I train at home with an airsoft CZ 75 SP-01 Shadow - it matches the live gun in weight and ergonomics so closely that the hand can't tell the difference. For building stance, grip and draw, that's more than enough.
And here's the idea that makes all of this worth doing seriously. One correct draw means nothing. The way one good trade doesn't make a trader, one clean rep doesn't make a skill. The body learns a movement only over distance - across a series of tens and hundreds of repetitions. Fifty draws today, fifty tomorrow. Not a heroic single rep, but a dull, honest series in which the correct movement becomes the only one you know how to make.
The trouble with a series is that your eye lies to you. "Felt fast", "looked clean" - that isn't data. So a mirror deserves a second set of eyes: the phone camera. That's what IPSC Tracker is built for. You hit Make Ready, stand in front of the mirror, and wait. The app holds a random pause and gives the signal - like a match, so you can't time the start. You draw on three counts, the dry-fire click is caught by the microphone, the time from signal to click goes into the log, and the camera records you from the side. That's double coverage: in the mirror you correct yourself on the fly, and on the footage you later catch what the reflection missed. Not "felt like it" - a number and a video. Tomorrow you compare them against yesterday and see whether you're growing or standing still.
IPSC Tracker is an Android app for dry fire at home. It holds a random Standby before the beep, catches every dry-fire click through the microphone, and records the run on video - so the draw you thought was clean gets checked against the footage, with the time logged next to it.
What comes after the draw?
On the third count, when the pistol is pressed out onto the target, the subject of this guide ends and the next one begins - working the sights. The front sight settles into the rear notch, the eye catches the picture. That's its own large conversation about aiming, covered separately. What matters here is that by the time you reach sight alignment, your stance, grip and press-out are automatic and don't cost you a single thought. The only thing left to think about is the shot.
Build the foundation at home. Stance, grip and draw are exactly the three things you don't have to pay for in ammo and range time. They're set by repetition, dry, in front of a mirror in your own room. Leave the range for what genuinely needs a live round.